Image Window:
The image window displays the original image and the processed one if you decide to apply the changes you've specified clicking the Process button.
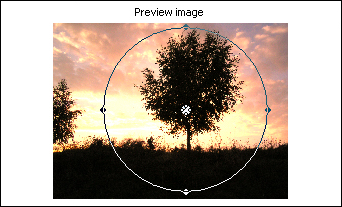
Preview Window:
The preview window on the top left immediately displays all the changes you specify without really applying them to your image:
Adjusting Toolbar:
Light Sources tab:
The light sources tab contains the controls allowing you to adjust the light sources parameters:
You can:
1. Add new and Remove existing light sources.
2. Change Ambient light luminosity controlling the overall brightness of the image. If you increase this parameter value moving the slider to the right, the image will become lighter.
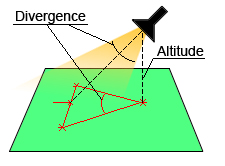
3. Choose between three light source types:
Spot is a directional light source casting rays inside a cone. The size and shape of this cone is controlled by the Divergence parameter. The altitude of the light source is adjusted via the Altitude slider. Imagine illuminating your image with a "virtual" flashlight. This effect is produced by the spot light source:
Omni is a point light source casting rays in all directions. It produces the effect of a light bulb placed at some distance from your image:
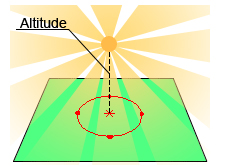
Parallel is a light source placed infinitely far. It produces the effect of sun rays going in parallel and falling on the image under the same angle. The parallel light source will produce beautiful effects only if the texture channel in the Surface options tab is switched on.
Intensity is the common parameter for all the light sources. It controls the brightness of the illuminated region. The position of the light source along with other several parameters can be changed by dragging the light source control points inside the preview window. The color of every light source can also be changed.
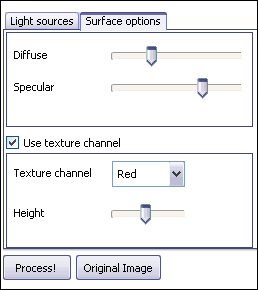
Surface Options tab:
These controls allow adjusting image surface light reflection properties:
1. The Diffuse and Specular sliders control whether the surface of your image is dull or shiny. Drag the sliders to alter the surface characteristics of the image.
2. Check the Use texture channel box to apply embossing effects to your image. You can select red, blue or green Texture channel. Drag the Height slider to the right to increase the embossing effect.
The Process button below the adjusting toolbar allows you to apply the changes you've specified to your image.
The Original image button allows you to jump to the original image.